 *mind you, the happy doll there is too expressed happiness for the completion of this assignment..not referring to global warming = P *
 IT'S DONE!!!!! FINISHED!!
If I were to create a animation to express my feelings right now.. it would be jumping up and down.. wearing a party hat.. wit confetti coming down.. a little exaggerated? = PAnyways, this has really been a fun and exciting process... This is gonna be a long post.. because I want to put everything in here.. to show my progress.. sit tight and enjoy = )
*Preferably, get some popcorn, a nice cold drink, ready your chair with a comfortable cushion.. make sure your feeling comfy and just enjoy... = D *
MY FOOTPRINTS FOR ASSIGNMENT 1:
I started with doing some research on Global Warming, as you can see in the previous posts. While reading through the article, something of interest struck me. WEATHER CHANGES. I then moved on to my sketches. I got some of the ideas from those images I found online.
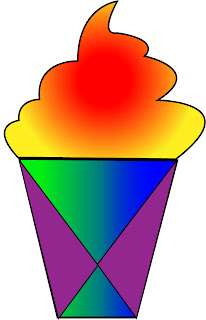
 I actually came up with another design and already showed it to my tutor, Dr Koo. But, recently, I have been having cravings for ice cream. Even though, I had the chance to eat ice cream, I now crave MANGO ICE CREAM! While I was doing some work, my mind was subconsciously thinking about ice cream. Then, it's like a light bulb wen 'ting'.. = P I tot maybe I should use the ice cream concept.


 That was the beginning of my journey. Here comes the harder part of my journey, Using illustrator to illustrate my idea.
Step 1: Creating the Cream
I start of by using the pen tool to create the cream part. I named the layer "cream".


This is the end product of the 'cream'.
Step 2: Creating the Cone.
I, again, used the pen tool to create the cone. I put this into another layer called "cone."
 Step 3: Creating the lines
I use the pen tool to create the 'X' in the cone.

 Thus, the cone is completed.
Step 4: Colouring the Cone
I coloured the cone with 3 colours. Yellow on the outside,orange in the middle and red on the inside. I used the gradient tool to create this effect.
 Step 5: Colouring the Cone
Next.... I coloured the cone. I use the combination of green and blue. I used the gradient tool again to create this two colour toning effect.

Step 6: Colouring the other side of the cone
I coloured the other side of the cone, purple. The swatch name is R=147 G=39 B=143.
 Step 7: The product.
When combining the cone and the cream. This is the product of it.
 Step 8: Final Product
After much thoughts and after doing some touch-ups. I decided to change the image to this.


Step 9: FINAL FINAL PRODUCT.
This is where the animation comes in. Confetti and party music in the background. = P
This is the end of my journey for assignment 1. My footprints so far. Hope you lasted till here. = ) Join me in the next post to know more about the meanings.


No comments:
Post a Comment